Workshop Creator - Lesson #3: Really Simple Structure
You’ve identified your audience and learned how to define clear learning outcomes.
Let’s get further into design.
When it comes to workshops, a surprising amount of the work (and resulting success) comes in the design phase.
Good design? You’re well-placed to smoothly handle any issues that may present themselves on the day.
Bad design? The chances of panic stations just went up…. big time.
In this lesson you’ll learn how to design a really simple structure for your workshop, and see how applying the principles of the best storytellers can help you create something engaging, impactful, and maybe even magical.
We’ll also look at the benefits of encouraging exploration, and how thinking like a movie producer can set you up for success.
Let’s get into it.
Movie Making

First, let’s talk about movies.
I first became enthralled by the movie business when I was 9 years old. I spent an afternoon in my local library in rural Cornwall reading a book about Hollywood special effects and I was completely hooked.
The movie business role I’ve since become most fascinated by is the producer.
Producers are responsible for so many aspects of a movie or TV production: from pitching a story and building a team; managing the finances; and helping bring the final product to audiences.
The work of a TV or film producer is also a great way to think about your work as a workshop creator.

Producers are:
- Story Builders: whether in the content itself, the overall arc of the experience, or the background story to sell the project
- Resource Collectors: bringing in on-stage talent and people working behind the scenes, securing finance, and collating key components to make it all happen
- Detail Detectives: doing the background research, checking facts, and looking out for the tiniest glitches and opportunities for improvement that escape the untrained eye
- Time Pessimists: it’s easy to be overly optimistic and make promises that can’t be kept. The Time Pessimist aims to deliver the best quality product while always managing expectations of everyone involved (while staying positive, of course!)
- Compelling Speakers: able to explain and articulate what’s happening throughout the process, and keep people engaged even when things inevitably get tough
- Team Enablers: making sure the whole team are seen and heard, and that they’re set up with what they need to succeed
Adopting this mindset can be really helpful throughout your workshop design process, but especially in the structure phase – which is what today’s lesson is all about.
3 parts of the structure
That’s right, a workshop structure is also a story. It has a beginning, middle, and an end.
More specifically, the three parts of a workshop arc can be thought of as:
- Opening
- Exploring
- Closing
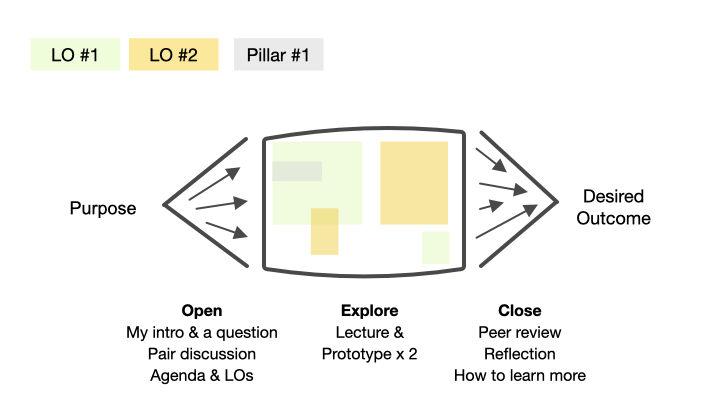
You can see an example in the diagram below.

Mapping out your workshop structure
First, draw out something similar to the diagram.
You can do it on a slide, a design program, or just on a piece of paper (I recommend the latter as you’ll probably want to quickly test a few versions).
A simple rectangle and a few arrows are fine for now – don’t worry about the squiggly lines.
Next, add two numbers: a zero at the bottom left, and another number bottom right. These numbers indicate the length of your session (for example, if you’re planning on a 4-hour session, write the number 4 bottom-right).
You now have the start of your structure. Time to start filling it in.
Part 1: Opening
In the Opening, you’ll want to introduce yourself and the session, along with the learning outcomes.
You’ll want to provide a structure for the session, and create a sense of commitment to and among your audience (and because you’ve done your research on who it’s for, this should flow naturally).
This structure can be as simple as stating the learning outcomes and signposting where the breaks will be – in fact, keeping the structure simple and clear is often a winning plan.
Part of the opening section will also feature some of the key concepts and content you want to share with your attendees. They’ll be getting to grips with these concepts in the next phase – Exploration.
Sketch in some space onto your structure diagram to indicate the length of your opening section. Feel free to add a couple of notes on the key things you’ll be including.
Part 2: Exploration
Exploration is where attendees start using their creativity – trying out tools, collaborating in groups, experimenting with new ideas.
You’ll use a number of different Formats, Activities, and Delivery Methods in this section – we’ll cover these in more detail in the next lesson.
For now, estimate the duration of your exploration section, keeping in mind your learning outcomes and who the audience is and what they’re here for.
You may also want to add some notes or use different colors to denote any particular activities or key concepts you want attendees to spend more time on.
Part 3: Closing
The third part of your structure is Closing.
Attendees will start integrating learnings and focusing in on the key elements of the session that were most effective for them.
Here you’ll provide space for them to document some of these learnings, and also encourage them to think about what they want to do next.
Again, there are a number of different formats you can utilize here – and again, we’ll dive into these in the next lesson.
Adding learning outcomes
You can also add your learning outcomes into your structure.
Add your learning outcomes to your structure diagram.
As you can see in the example, your learning outcomes don’t have to be linear or in set chunks; there’s a good chance they’ll intertwine and overlap.
You may introduce both learning outcomes at the start, then spend some time focused on learning outcome 1, before bringing in number 2, and then integrating both together.
For now you don’t need to worry about being too accurate – things will change as the content is added.
However, overlaying your learning outcomes onto your structure helps you see where you may need to focus particular time and energy during the session. This can be invaluable in the content creation stage.
Optional: Now’s the time to add some squiggly lines to mark out the arc of the session – where activities are connecting with particular learning outcomes, or where the most important concepts may weave in and out of the workshop.
Timing
One other key part of the structure is the timing plan. Again, this doesn’t need to be precise at this stage, but there’s one key principle to abide by:
Don’t go any longer than 2 hours without giving attendees a refreshment or bathroom break.
In fact, 90 minutes is preferable, but 2 hours should be the absolute maximum. Any longer and you’ll end up with uncomfortable, irritable attendees, and a frazzled facilitator (i.e. you).
Pro Tip: Online, divide this number by 2. It’s good practice to take a break every 45 mins or so
Now is where those numbers you added earlier really come into play.
On your structure diagram, draw a vertical line for where you’re going to place each break (if you’re running a session longer than half a day you’ll probably need to add a break for lunch too).
Finally, if you think you’ll need some special effects or particular resources to deliver your session (like flipcharts, whiteboards, technical equipment, or a special room setup) – make a note of these next to your structure diagram.
Really Simple Structure: Reflection Time
To finish up this lesson, go back to the movie producer mindset with these 3 questions.
- Where are the peaks in the story?
- Where might an audience’s attention dip?
- Which parts of the session are most important to highlight and spend the most time on?
Annotate your diagram with anything new you notice from answering these questions. You’ll probably shuffle things around a lot during the design phase, so don’t worry if your first draft feels very rough.
You’ve now got the basic structure and skeleton of your workshop.
Next up is adding some content to bring it to life!