How to create an interactive workshop in Zoom (Part 2)
In the first part of this guide, I covered the advance setup of the workshop on Zoom. Now it’s time for the exciting stuff – running the workshop itself.
As a reminder, this post doesn’t cover all the design aspects of a workshop (check out our toolkits and courses for more on that), but there are a bunch of tips to get the most out of Zoom.
Coming Soon: A guide for Microsoft Teams! Get early access >
Ready to go? Let’s do it…
Before the workshop
Preparation
At the end of part 1 we got the Zoom registration link set up. Hopefully by now you’ve had a bunch of notification emails hitting your inbox – lots of lovely people signing up for your workshop.
In the days before the workshop, it’s worth taking a look at the answers they gave to the questions you asked (this was the ‘Custom Questions’ bit). This info doesn’t show up on the notification email – you only get someone’s name and email address – so you’ll need to go to Zoom to do this. Here’s how.
Jump into your Zoom account, go to My Meetings, choose the Workshop meeting, then scroll to the Registration section.
In the ‘View’ tab, click the person’s name and you can see the answers they gave you. It’s worth spending a bit of time here – even with a group of strangers you’ll probably see some common themes or challenges come up.
Pro Tip: Having a few of these noted down can be very helpful during the delivery of the workshop itself – you can use them as prompts or other talking points
I also suggest sending people a reminder email a couple of days in advance, ideally with some pre-boarding info (even a few bullet points is fine). Just because they signed up doesn’t mean they’ll remember to attend, let alone have an invite in their calendar.
Pro Tip: Online sessions are pretty similar to in-person events when it comes to drop-out rates; most event organisers I know expect 30-40% of signups to show up for a free event – behaviour online seems to mirror this pretty closely.
Pro Tip: People don’t read stuff. It’s definitely worth sending some pre-reading or onboarding materials, but don’t expect everyone to do it.
To get a handy list of all the registrants’ email addresses, go to Account Management > Reports > Meeting > Generate. It’ll pop out a nice little CSV file for easy copy and pasting.
On the day
You’ve got your materials prepped, you’ve practiced transitions and pacing, you have a bunch of participants who are raring to go.
To give yourself time to settle in, get the meeting started 15 minutes early. Hop into your Zoom account, find the meeting and hit Start. The Zoom app will fire up and there you are – the one and only participant.
Here are a few things to check off before the workshop starts.
Recording
- You may see the recording has started. I sometimes pause this as I don’t like the idea of 15 minutes of my gawping face being on tape, but it’s also very easy to forget to unpause once you’re in the swing of things, so I suggest letting the recording run – you can always do a bit of editing later.
Screen Share
- Hit the little arrow next to Share Screen. It’ll have defaulted to ‘One Participant can share at a time’. I suggest leaving this as is unless you’re looking to do some activity with multiple slide decks or demos.
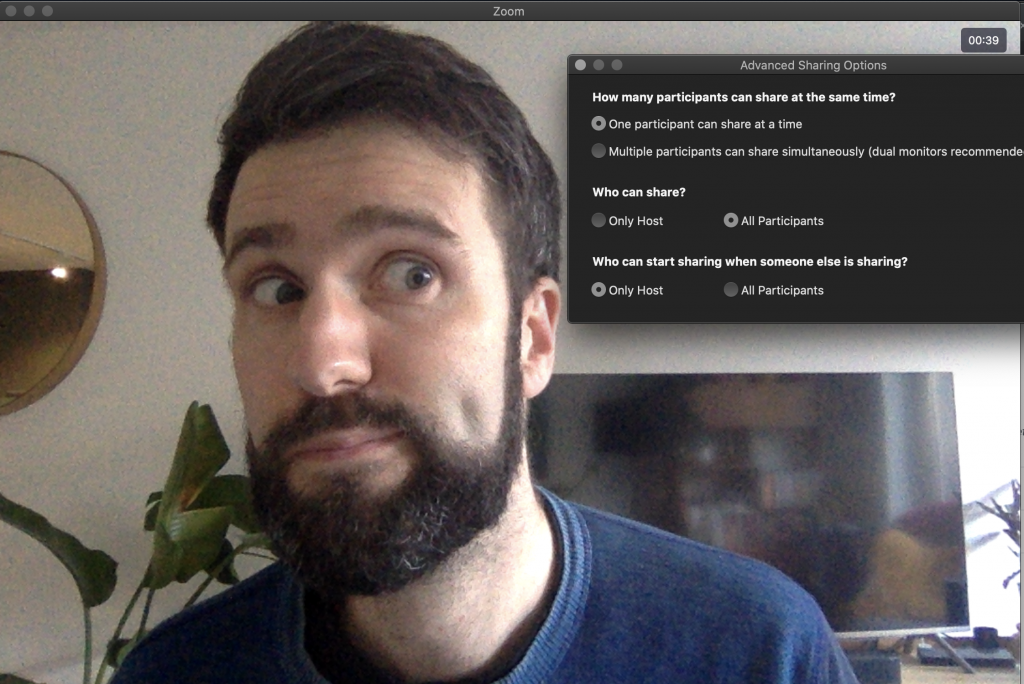
- Underneath, you’ll see ‘Advanced Sharing Options’. Click that and you’ll see a modal appear. I strongly suggest setting ‘Who can share?’ to ‘Only Host’. Obviously if your workshop involves participants sharing stuff you’ll need to set this to ‘All Participants’ but generally, I recommended using ‘Only Host’ as a safety catch. This prevents Zoom Bombing which I mentioned in part 1 – we don’t want someone randomly coming into our session and taking over the screen share with something NSFW (Not Safe For Workshops)
- Try doing a screen share to make it works ok. You may want to order your windows so your sharing materials (e.g. presentation is at the front). It’s also worth closing other applications and only having your workshop stuff visible.
- In the controls at the top, you’ll see a ‘More’ tab. Hit that and choose ‘Disable Attendee Annotation’. Again, you may want to leave this on for certain types of sessions, and honestly most people a) won’t do this without permission (workshop people in general are wonderful), and b) probably won’t even know the feature exists, but it’s worth doing…just in case. Not sure I’d want an attendee writing ‘HOWARD STINKS’ in bright red crayon across my slides.
- While you’re here, make sure you can see ‘Hide Video Panel’. This means you can see the video panel. You should see a thumbnail video tile of yourself towards the right of the screen. I find it helpful to be able to see the participants in thumbnail view when I’m presenting – it’s good to gauge if they are following the material, and digging my bad jokes of course.
Pro Tip: Once you get a bit more comfortable, hit the 3 dots at the top-right of the video of yourself, and choose ‘Hide Self View’. It’s weird how easy it is to get distracted by your own face during the session…or maybe I’m a narcissist. Remember, workshops are about them, not you.
Breakout Rooms
Ok, time for the really good stuff. Breakout Rooms are probably the killer feature in Zoom right now.
I’ve been surprised how many participants in the Workshop Creator Express sessions have said they’d never seen a workshop run in that way before. While I would love to think they were referring to my wit, charm, and beautiful backgrounds, what really gets them excited is the breakout rooms, and in particular the rapidly rotating use of them in the four sprints.
All Zoom accounts come with Breakout Rooms, and I’m amazed how few people still seem to use them. Yes, setting them up and managing them is more work, but just like workshops in general, these opportunities for conversation, connection and collaboration are where the magic happens.
Pro Tip: Get a few friends to do a trial run of using breakout rooms with you as the room setup can be a bit fiddly when you’re not used to it
Here are the essentials for getting your breakouts set for success.
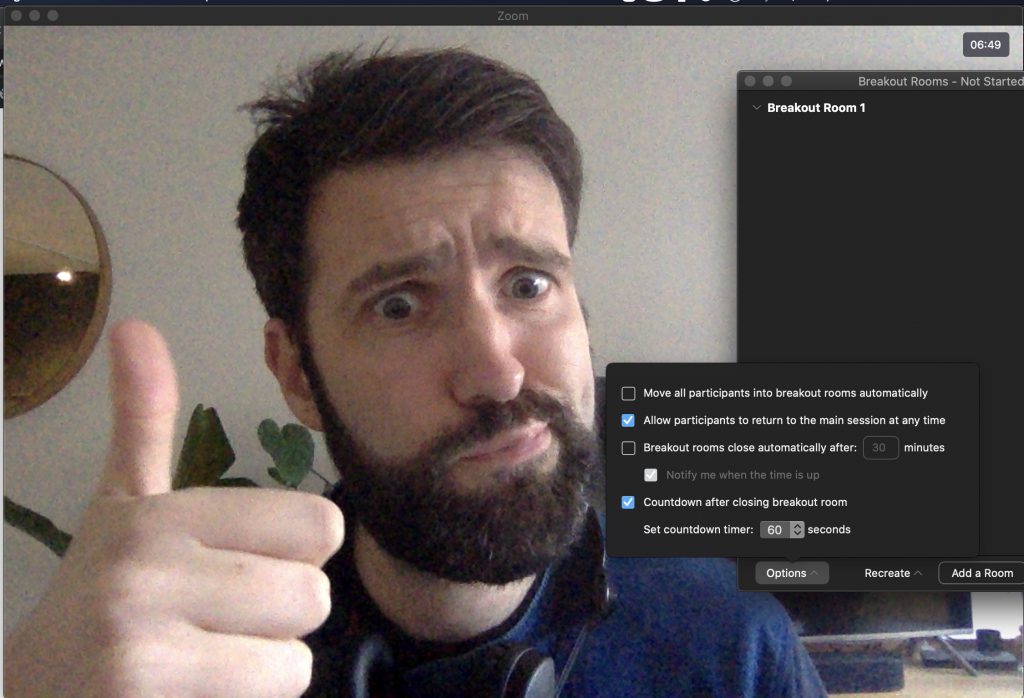
Hit the ‘Breakout Rooms’ option on the controls at the bottom of the screen, and you’ll see a black modal appear. There’s no one here yet, so they’re all empty. To get ourselves prepped we can do a couple of things. Hit ‘Options’. Again, how you set these is up to you and your preferences, but here’s how I do it:
- Move all participants into breakout rooms automatically: I set this to No. This means participants have to hit the ‘Join room’ button that appears, but I actually prefer this for two reasons: it means they’re interacting, and I still have a few seconds grace to share any instructions I may have momentarily forgotten.
- Allow participants to return to the main session at any time: I leave this set to Yes. Usually there will be either just me or no one in the main room, but the ‘Ask for Help’ option doesn’t get used much, so giving people this optionality is usually a good idea, especially if a group may finish up early for some reason
- Breakout Rooms close automatically: No. Leaving this unchecked means more work for you, but it’s better in the long run. Some groups will finish early than others, you may realise the prompt you gave isn’t working, or you need to nip out some time or add a bit more. Having more flex here can help you a lot.
Pro Tip: Be sure to keep track of time! It’s very easy to let this slip and workshop creation success is often down to time management. I use a combo of a handwritten agenda with timing checkpoints, and my phone to manage breakout timekeeping.
- Countdown after closing breakout room: Yes, 60 or 90 seconds. Most breakouts are short (5-10 minutes) and this feature gives participants a heads up, lets them come back easily in one click, and pops them back into the main room at the end.
When you’re done, close the Options second and the Breakout Room, and you’ll be back in the main room again.
That’s it for prep. Give yourself 5-10 minutes to do all this. Again, practice makes…better 🙂
Opening the doors
By this point you probably have some people showing up in the Manage Participants list. Real people. Here for you and what you’re offering. Yikes!

When you’re ready, hit Admit All. It’s good practice to do this on time, or maximum a couple of minutes after the scheduled start time. People don’t like to be kept waiting.
Ideally you’ve got the majority of your attendees in the room now.
I like to give a quick 20-second intro so people know who am I, and that we’ll be getting started in a minute. It’s worth asking people to turn their video on and mute their mics too.
Pro Tip: Here’s a quick video on how to do a great workshop intro
This will feel weird the first few times. A bunch of strangers, looking at each other, waiting for… something. It’s fine, but don’t leave it like this for more than a couple of minutes.
During this time there will probably be others hitting the waiting room (remember, the advance set up meant people have to be admitted by you). Those people will appear in the Manage Participants list. I just keep hitting ‘Admit’ as they show up so we can fill the room quickly. Inevitably you’ll have some latecomers.
Pro Tip: Depending on the design of your session, you’ll want to draw the line somewhere; my rule of thumb is 10 minutes. For anyone who shows up after that, I send them a message (copied from my pre-prepared text file with links and prompts for the workshop), that admission to the session is now closed but they are welcome to sign up for the next one.
Once you’ve got everyone in place, make sure you’re unmuted, and get the show on the road!
During the workshop
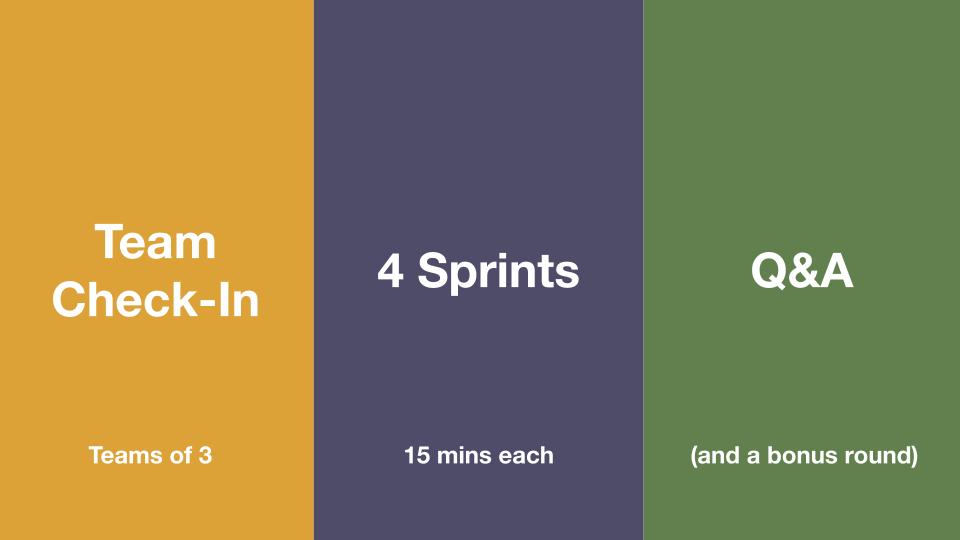
Let’s revisit that format as shared in Part 1:
Open
- 3 min assembling
- 2 min intro
- 5 min content bit
- 8 min breakout
- 2 min regroup & setup
Explore
4 x 15 min Sprints:
- 7 min content bit (3 scenes, 2 mins each)
- 7 min team breakout
- 1 min reset / rotate
Close
- 7 min Q&A / Pair Reflection
- 3 min wrap
Bonus
- 10 min Q&A
Introductions
You’ve already given yourself a few minutes for the assembling, then it’s intro time. I suggest making your intro short, then sharing your screen for some level-setting content, e.g. Why this workshop exists, why it matters, what people should expect to get from it, and an agenda.
You can then loop back (i.e. stop sharing screen) and pretty much do your intro again. Twice is nice.
Pro Tip: I’ve recently started using worksheets for everyone to reference during the workshop. These worksheets are very simple – just a Google Doc with the questions and prompts for the breakout sessions. Having this available as a shared doc for people to make a copy of saves a ton of time both in content delivery and pasting prompts into the chat. Just be sure to give everyone a minute or two to get the document open before the first breakout

Breakouts
It’s then time for breakout rooms. Hit the Breakout Room button, and you can choose the number of rooms you want to create. I aim for rooms of 3 where possible and then get Zoom to assign people automatically. You can do the manual selection, but this can result in a lot of fiddling around while you’ve got a bunch of people in the main room waiting for the breakouts to open.
Hit ‘Create Breakout Rooms’, then ‘Open All Rooms’ and everyone will get a notification to enter the rooms.
After doing your first breakout, you’ll be back in the main room for some more content.
Pro Tip: A great way to keep your workshop engaging and purposeful is to bake your breakout prompts into the content. This way, participants know they need to keep track during the content piece – if they tune out, they’ll feel kinda stupid during the breakouts as they won’t know what the prompt means.
Once you’re done with the first breakout, all you need to do for future breakouts is hit ‘Breakout Rooms’ on the main controls, then ‘Recreate’. Your rooms will be recreated with the same groups. Easy.
Pro Tip: I suggest keeping the groups the same for either all, or all but 1, breakouts. You want people to feel connected, and as this can be particularly tough online (especially in a short period of time), switching the groups around all the time is a surefire way to miss those connections. The one breakout where I change it up is a quick pair reflection at the end – this is a good chance to connect with someone one new and compare notes on the shared experience they’ve both just had.
3 more sprints, and closing
Now it’s just about following the flow – content, breakout, check-in. Repeat x4.
Keep the energy up and the positive vibes moving, and summarise each sprint as it closes.
As you move into the closing stages, you may have time for Q&A and/or a Pair Reflection activity. I found that more often or not I didn’t have enough time, so instead I built 15 minutes after the session for Q&A (and flagged it during my intro at the beginning of the workshop).
My way of summarising the session is pretty simple: whizz through the learning outcomes for the workshop and a few of the key takeaways from each sprint (you can use slides for this if you like, just keep them light), mention I’ll be following up with resources, say thanks to everyone for their time and energy, and then get everyone to wave goodbye 🙂
Once you’ve done Q&A for those who want it (quite a lot of people probably do, which is nice), and everyone’s headed out, press End Meeting, and you’re done.
And then…it’s time for a rest. Have a cup of tea, have a lie-down. Put on some heavy metal at full volume. Whatever works for you.
After the workshop
Fortune favours followups… or something like that.
Regardless, it’s good to follow up promptly. In-person I’ll try and get feedback in the room, but online that can be kinda weird, especially in a short-form one-off session.
Instead, I’ll run a report from Zoom of the participants, do a Bcc email (watch those ‘To’ and ‘Cc’ fields!) and send over some more resources and other bits within 24 hours of the workshop.
Pro Tip: Now, you can choose to email everyone who registered, but I’d suggest just emailing resources to everyone who attended. After all, they’re the ones who committed, and brought their vibes and energy to the workshop. Here’s how we do that.
To run a participant report, go to Zoom, then Account Management > Reports > Active Hosts. You should see your workshop listed. If not, toggle the date filter until it shows up. Hit the highlight numbers under Participants. This probably looks really high – were there that many people in the session? Alas not. This number is the log of the number of logins by participants, which I think includes the number of times they logged into the meeting itself, and also the number times they went from breakouts to main room, and the duration of each interaction. There’s also a thing called Attentiveness Score, which honestly I’m not a fan of as a metric (feels too much like an exam – and this ain’t school).
Hit ‘Show Unique Users’ and you’ll get one record per participant. Export to CSV, open it up.
You’ll see a total number of minutes for each person. Some of these may be very low. Two reasons for this:
- They showed up, left quickly, never came back
- They needed to sign in a few times, maybe with different screen names.
Delete those in category (1). Check category (2) so you have one record for each person. That’s your final participant list – and they get the goodies. Stick em into the email, hit send. Workshop magic in their inbox.
And with that, you’re done. A 90-minute workshop, run on Zoom, with multiple breakouts and multiple formats.
Here’s the rundown of the all the bits this guide covered:
- Setting up a custom Zoom room
- Setting up registrations and auto emails
- Reviewing your attendee list
- Sending out a pre-workshop email
- Setting up recording, screen sharing and breakout rooms
- Introducing the workshop
- Running the first breakout
- Keeping the pace and closing the workshop
- Following up with participants
There’s so much more I could share on this – from activity design to presentation best practices; logistics to onboarding – but I’m already past 5000 words (!) for these two posts.
If you want to learn more, here are a few steps you can take right away:
- Apply to join our workshop creator membership community
- Become part of our next live program
- Send me an email with any questions you have – I’d love to hear from you.

Member discussion